Understanding How to work with LOG Gamma Curves, dynamic range and stops of light
Log isn’t a color space so much as a gamma curve. It is a mathematical way of squeezing the huge, linear brightness range your camera sensor sees into the limited code values that can be recorded. By “compressing” highlights and “stretching” shadows, a log curve preserves more dynamic range for color-grading than a normal Rec. 709 curve would. That’s why the straight blue line (linear) in the graphic quickly plateaus under the red log curve: the same highlight information fits into fewer code values, letting you pull it back later without clipping.
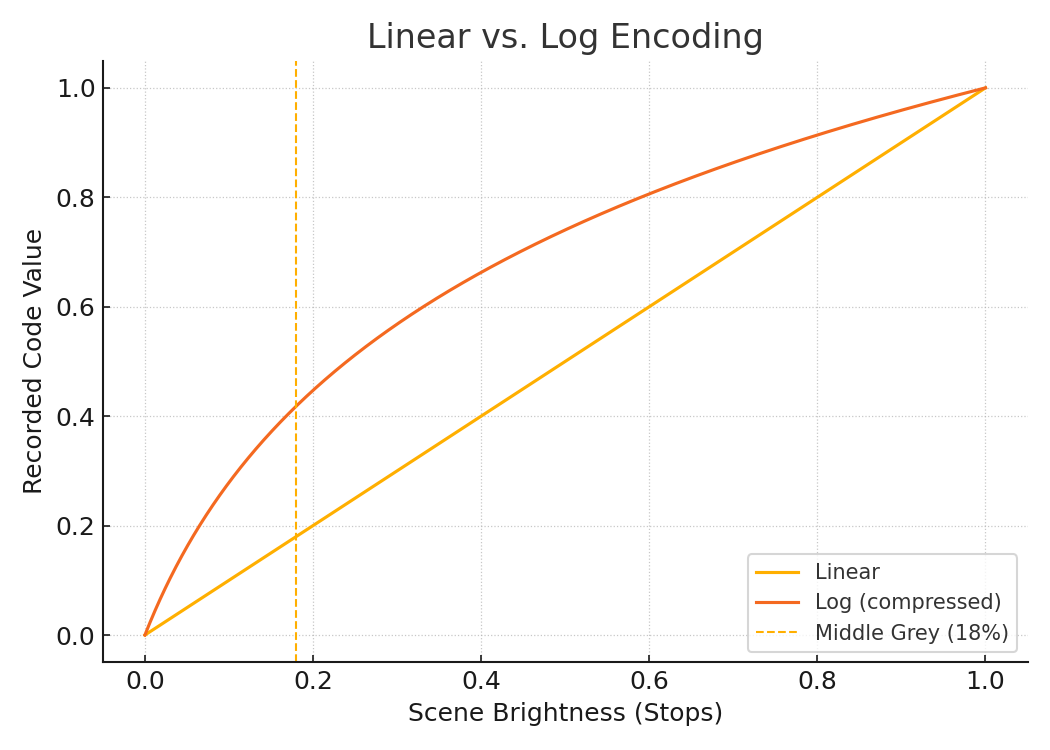
How to read the “linear vs log” graph
Axes at a glance
Horizontal (X) axis — Scene Brightness by stop (explained in the next section)
At the left is deep shadow; slide right and you’re moving through mid-tones toward bright highlights.
Vertical (Y) axis — Recorded code-value
0 = digital black at the bottom, full-scale white at the top. These are the numbers that get written into your ProRes/R3D/ARRIRAW file.
The two curves
Straight diagonal (linear)
If the sensor output were recorded “as is,” brightness and code-value would rise 1-for-1. Notice how the line slams into the top of the graph long before the X-axis ends those clipped highlights are data you’d never get back.
S-shaped curve (log)
The log line hangs low in the shadows, then flattens out into a gentle shoulder up top. That shape compresses highlights (so they don’t hit the ceiling) and spreads shadow detail (so you can lift them in the grade without banding).
Mid-grey marker
Most manufacturers stick an 18 % grey card at a higher code-value in log than in linear (for ARRI Log C3 it’s ≈ 38 %, for Sony S-Log3 ≈ 41 IRE). More room above mid-grey = more highlight latitude.Toe & shoulder
Toe (left bend)—soft roll-off into the deepest blacks; lets you keep texture instead of crushing.
Shoulder (right bend)—highlight roll-off; stops skies, practical bulbs, or snow from blowing out.
Why this matters when you shoot
Expose for the highlights: because the shoulder is gentle, you can push exposure a bit (“rating” ISO lower) to keep noise down, knowing the top end won’t clip as easily.
Grade with a LUT or IDT: the first thing you’ll do in post is convert that log curve back to a display space (Rec. 709, HDR, ACES, etc.). The extra data in the shoulder and toe is what lets you shape contrast without falling apart.
Different brands, same principle
Although ARRI Log C, RED Log3G10, Sony S-Log3, and Canon C-Log3 have slightly different mid-grey placements and shoulder shapes, they’re all applying this same trick—more scene stops into fewer recording bits—so colorists have headroom to play.
Mental model
Imagine trying to squeeze a long slinky (your sensor’s dynamic range) into a small box (your 10-bit file). The linear slinky sticks straight up and spills over the top; the log slinky coils tight at the highlight end and stretches out where shadows need elbow-room. The box shuts, nothing’s lost, and you can uncoil it later in DaVinci or Premiere.

What’s a “stop” of light?
A stop is the simplest unit of brightness in cinematography and photography. Jump one stop up and you double the amount of light hitting the sensor; drop one stop and you halve it. Think of each stop as a single click on a dimmer switch that’s always a 2× change.
Aperture
+1 Stop = f/4 → f/2.8
-1 Stop = f/2.8 → f/4
Shutter Speed
+1 Stop = 1/60 → 1/30
-1 Stop = 1/30 → 1/60
ISO / Gain
+1 Stop = ISO 400 → ISO 800
-1 Stop = ISO 800 → ISO 400
Brighter signal but more noise at higher settings.
Lighting
Double fixture output / move light 1.4× closer
+1 Stop = Halve output / move light
-1 Stop = 1.4× fartherInverse-square
Law: distance ≈ √2 per stop.
Why stops matter?
Consistent exposure math – Because every stop is a 2× change, you can quickly swap one parameter for another (e.g., close the aperture one stop, slow the shutter one stop) and keep exposure constant.
Dynamic-range thinking – Camera spec sheets list latitude in stops, so knowing the scene contrast in stops tells you if highlights or shadows will clip.
Lighting ratios – Key–to–fill ratios are described in stops (e.g., “Key is 2 stops over fill”), making communication on set clear.
Creative control – Choosing which control to adjust for a stop affects mood: shallower depth-of-field, more motion blur, grainier ISO look, or stronger/harder lighting.
Rule of thumb: Whenever you need “one notch brighter” or “one notch darker,” think in stops first—then pick the tool (aperture, shutter, ISO, or light placement) that best preserves the look you want.

LOG breakdown by Camera
ARRI
ARRILog C3 (ALEXA Classic/XT/65)
Log C4 (ALEXA 35)
Cineon-style toe/shoulder; ~14.5 stops on older sensors, ~17 stops on ALEXA 35.
Ships alongside ARRI Wide Gamut so skin-tones stay neutral.
LogC4 remaps 18 % grey higher (CV 444 in 12-bit) to maximise coding precision in HDR workflows.
RED
REDREDlogFilm (legacy)
Log3G10 (IPP2 pipeline)
REDlogFilm mirrors Cineon for film-style grading.
Log3G10 encodes 10 stops above mid-grey; “3G” means mid grey is 1/3 of max code-value, great for HDR deliverables.
Always married to REDWideGamutRGB in IPP2.
Sony
SonyS-Log1 (F35/F3)
S-Log2 (FS 700, A7S I)
S-Log3 (FX, Venice, α-series, FX-Series)
S-Log1 ≈ 12 stops
S-Log2 lifts highlights another stop (~14 stops).
S-Log3 mimics the Cineon slope, mapping middle grey at 41 IRE so it grades predictably; up to ~15 stops.
Typically paired with S-Gamut3.Cine or S-Gamut3 for wide color.
Canon
CanonC-Log
C-Log2
C-Log3
C-Log = ~12 stops, easy to grade.
C-Log2 captures up to 15 stops but pushes shadows thin—best for controlled lighting.
C-Log3 splits the difference: ~14 stops with smoother shadows and a shoulder tuned for HDR mastering.
Designed to work with Cinema Gamut or BT.2020
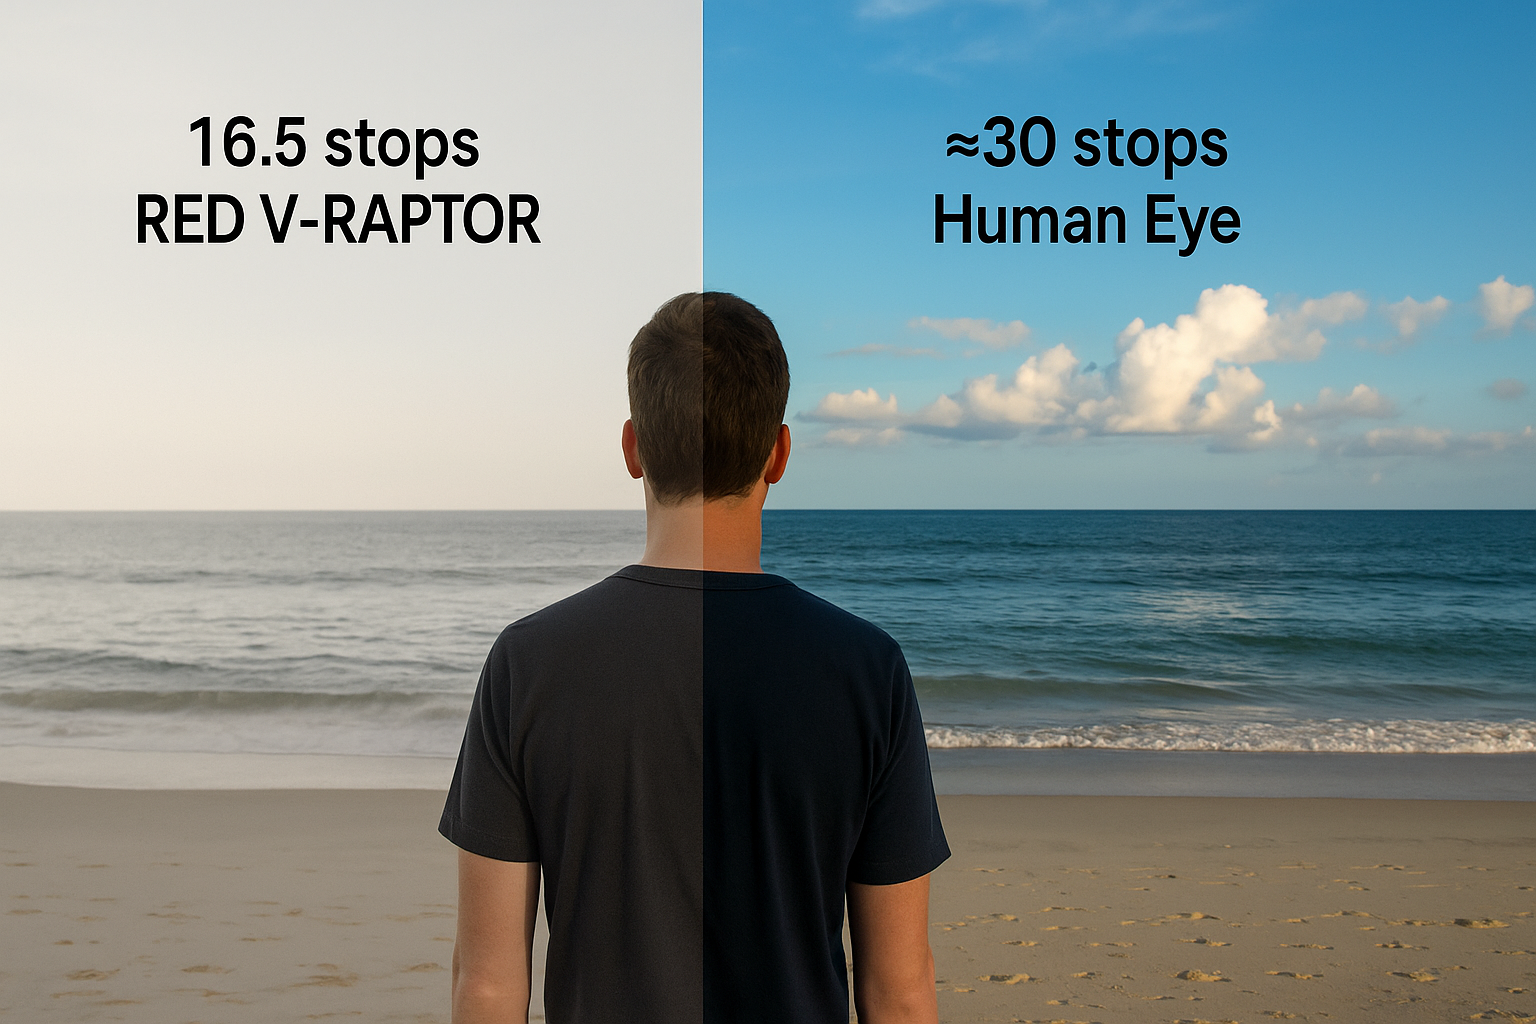
Dynamic range of your eye vs RED V-Raptor (Not an exact comparison)
Understanding Dynamic Range
Dynamic range is how much “dark” and “bright” a camera (or your eyes) can see at the same time.
Think of it like this:
Magic Flashlight Game
Imagine you’re in a room that has a super-bright window and a shadowy fort made of blankets.
If you can see what’s outside the window and still spot your toys hiding in the fort, you’ve got great dynamic range!
Paint Buckets
Picture two paint buckets.
One bucket holds light paint (for bright things).
The other bucket holds dark paint (for shadow things).
A camera with big buckets can collect lots of both paints, so the picture shows bright clouds and sneaky cat under the couch.
A camera with tiny buckets fills up on bright paint too fast, and the clouds turn pure white while the cat turns into a black blob.
Why it matters
Big dynamic range = You see everything, from shiny sun to spooky shadows, all in one picture.
Small dynamic range = The bright parts might look blinding and the dark parts lose their details, like coloring outside the lines.
Super-Eye Cameras
Fancy movie cameras (like ARRI, RED, Sony, Canon) have bigger “paint buckets,” so filmmakers can capture sunny skies and dark caves without losing details.
Dynamic range is just a fancy word for “How well can this camera see the really bright stuff and the really dark stuff at the same time?”
“Starter-kit” technical LUTs for the big four cinema brands
These are the vanilla conversion LUTs you’ll almost always drop onto a fresh clip before you start grading. Think of them as the “develop” step that turns each camera’s log+wide-gamut combo into a normal Rec. 709 or HDR picture; creative look LUTs come after this.
ARRI – Log C
(Log C3 on ALEXA Classic/Mini/65, Log C4 on ALEXA 35)• Log C3 → Rec. 709 (K1S1)
• Log C3 → Rec. 2020 100 nits
• Log C4 → Rec. 709 (ALF4)
• ACES IDT (Log C3 & Log C4)
RED – RWG/Log3G10
(IPP2 pipeline)• RWG/Log3G10 → Rec. 709 (Medium Contrast / Medium Roll-off)
• RWG/Log3G10 → Rec. 2020 100 nits
• RWG/Log3G10 → PQ HDR 1000 nits
• Legacy REDlogFilm → Rec. 709 (for older projects)
Sony – S-Log3 / S-Gamut3.Cine
(Venice, FX-line, α-series)• S-Log3 → Rec. 709 (3D LUT)
• s709 (Sony’s filmic Rec. 709 look that matches VENICE’s monitoring)
• S-Log3 → HLG 1000 nits
• S-Log2 → Rec. 709 (if shooting older cams)
Canon – C-Log / Cinema Gamut
(EOS C-series & R-series hybrids)• C-Log → Rec. 709 Wide DR
• C-Log3 → Rec. 709 Wide DR (most popular)*
• C-Log2 → Rec. 2020 100 nits
• ACES IDT (Canon-IDTs are in the same bundle)
C-Log3 is Canon’s sweet-spot curve—better shadows than C-Log, easier mids than C-Log2—so its Rec. 709 LUT tends to be the go-to.
Quick tips for using these LUTs in post
Apply the technical LUT first in the node/FX stack so you land in display space before adding creative looks, contrast, or secondaries.
Stay in 10-bit or 12-bit timelines; an 8-bit render cache can band when the LUT re-expands highlights.
Match gamut + log curve exactly (e.g., Sony S-Log3 with S-Gamut3.Cine, not S-Gamut3) or colour will skew.
Monitor on the same transform you’ll deliver—if final is HDR, monitor through the PQ or HLG LUT rather than a 709 one.
Drop these packages into Resolve’s LUT folder (or Premiere’s Creative LUTs directory), refresh, and you’re ready to grade no matter which camera rolls up on set. Happy colouring!
FOR YOU
Enjoy a crap load of free LUTS